Search This Blog

Tuesday, January 31, 2012

Simple and Traditional Split Pea Soup.....


Traditonal Split Pea Soup.... is if it ain't broke than why fix it?  I know there are a lot of spin offs on split pea out there... but I still favor the traditonal slow cooked in a large heavy pot or dutch oven with a ham bone.  Call me old fashioned.... but there is just something so simple and perfect about cooking it that way.  I made a big heaping pot for dinner tonight.  Needless to say.... while I was hoping for leftovers for tommorrow, I don't think there will be any. 


Funny that this Jar that was sitting quietly on my pantry shelf would make a big helping of hearty, comforting goodness.........


Split Pea Soup Recipe

Ingredients

2 tbsp. butter
1 medium onion, diced
3 stalks celery, chopped
3 carrots, sliced or diced
2 bay leaves
1 tablespoon fresh thyme
Salt & pepper to taste
2 cups of dried split peas
6 cups broth of choice. I prefer Chicken Broth.
1 smoked ham hock or ham bone (omit if you are a vegetarian) You could also use 1 cup of diced ham.

Directions

In a large, heavy pot (about 4 quarts in size) melt the butter and add the vegetables, and cook until the onions are soft. Add the bay leaves, thyme, and salt & pepper and stir. Add the split peas and stir to coat with the spices and the butter, then add the broth and the ham hock/ham bone. Turn heat down to low, cover, and simmer for a hour. Check on the soup. It should be creamy and soft, but not so thick that it's like a pea loaf. If it's getting too thick, add a little more broth. The soup is ready when the peas are soft, anywhere from 1 1/2 to 3 hours.


The final result.... waiting to be dished up!

Monday, January 30, 2012

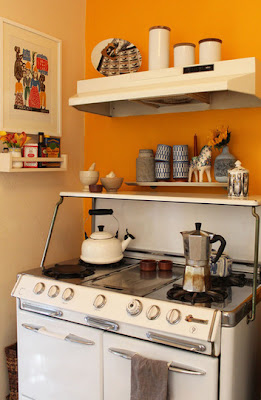
Swoon.... Vintage Stoves

I am so smitten with vintage stoves.  My nanny (what I call my grandma) had her original stove from the 1950's up until she moved just a few years back.  I kick myself that I didn't take it when she moved.  She just got rid of it when she moved across the country.  How I wish I had it......


It's my life long dream to have a vintage stove.... I wouldn't mind a vintage fridge either!  Of course that would have to wait until the kiddos are much older....  


Saturday, January 28, 2012

Chorizo.... Beyond the Eggs


We here at the byrdie house love Chorizo and eggs.  There is just something about the Mexican pork sausage that has such a robust flavor.  Most chorizo is seasoned with smoked paprika and chili's which make it satisfying even on it's own.  I had some chorizo sitting in the fridge and decided that I wanted to cook it with something other than eggs. 
This Chickpea and Chorizo soup is so easy and yummy.  It makes for the perfect meal on chili nights.  Not to mention as it simmers your whole house will smell like heaven.  The Byrdie family is eating this as I type.


Chickpea and Chorizo Soup
makes about 2 quarts

12 ounces chorizo sausage
1 large white onion, chopped and thinly sliced
4 stalks of celery, chopped
6 cloves garlic, minced
2 tablespons fresh thyme, minced
1 can chickpeas, drained and rinsed
1 can Great Northern beans, drained and rinsed
4 cups chicken broth
1/2 cup white wine
1/4 cup Italian parsley, chopped
1 tablespoon olive oil
Salt and pepper

Chop or crumble the chorizo into bite-size pieces. Film a heavy pan lightly with olive oil and put over medium-high heat. Cook the chorizo for about five minutes or until it starts browning and and smoking. Lift out and drain on a plate lined with paper towels.

Pour a little more olive oil into the pan and turn the heat to medium. Add the onions and celery and cook for about ten minutes, or until soft. Add the garlic and thyme and cook for another couple minutes, or until golden and fragrant. Add the chorizo back in, along with the chickpeas and beans. Cook all together for a minute, stirring, until the beans are well coated with the onions and oil.

Add the broth and white wine and bring to a boil. Lower to a simmer and add the parsley and olive oil. Simmer for about half an hour, or until slightly reduced. Season to taste with salt and pepper before serving.

Friday, January 27, 2012

Do It Yourself..... Valentines Day Crafts - Photo Cards


Here's another easy and adorable idea.  I love this little project because you can probably find a lot of the supplies needed around your home.  Card stock, construction paper, baking papers and a few photos are all you need.  Make sure your kiddos help with this one.  This would also make a great Valentines gift for the grandparents.

My Favorite New Snack : Homemade Fruit on The Bottom Yogurt


Here's a little bit of trivia about me.  I love yogurt.  I have tried all different kinds.... every brand and every type imaginable.  Recently however, I have become a big fan of making my own mixes at home.  The only problem is portablity.  Well now my problem is solved.  With the help of 1/2 pint mayson jars.... you can make your own fruit on the bottom yogurts and even better, they are portable!  You can make any mix you like. 


For my mix.... I used plain Greek yogurt, berry jam, fresh blueberries and topped with a drizzle of honey and granola. 


I would love to hear what your favorite kind of yogurt is..... I am always up to try something new!

Wednesday, January 25, 2012

Do It Yourself..... Valentines Day Crafts- Printer Friendly Valentine Cards


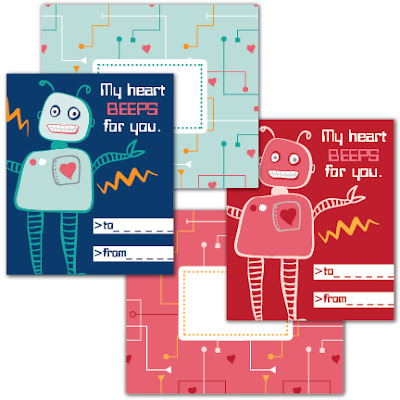
I am not a fan of store bought Valentines.  Every year I usually print out Valentine cards and then the kiddos and I assemble little treats to go with them.  This year however..... I now have two kiddos in school.  Between the two of them that is 48 Valentine Cards I need to print. What does this mean?  It means that there Valentines are gonna use up all of my ink!  So here is a little round up of my favorite and yes printer friendly Valentines for your little ones to hand out.  Yay for the conservation of ink!

1.  Sweetheart Classroom Cards - Bunny Cakes


2. Robot Valentines - Cottage Industrialist


3. Adorable Mini Valentines - Amy is the Party


4. Zebra Cards - Bunny Cakes


5. Owl Valentines Day Card - Living Locurto

Baked Apple Streusel Pancake Bars......


Can you tell Breakfast is my favorite meal?  Do you ever make pancakes and then have leftover batter???  This is a great way to use it up!  Talk about a win win right? 


Baked Apple Streusel Pancake Bars
Yields: 20 Bars


2 cups all-purpose flour
2 teaspoons baking powder
1 teaspoon baking soda
1/2 teaspoon kosher salt, or slightly less table salt
3 tablespoons sugar
2 large eggs, lightly beaten
2 3/4 cups buttermilk (whole milk can be substituted without any problems)
3 tablespoons unsalted butter, melted
1 small apple, diced into 1/2" pieces
2 cups Granola ( I like  apple cinnamon granola)

For Topping:
1/4 cup all-purpose flour
1/4 cup brown sugar, firmly packed
3 tablespoons butter, melted
1 teaspoon cinnamon
1/2 teaspoon freshly grated nutmeg

Grease and Parchment your choice of baking dish. We used 2 8"x8" pans (for the straight sides), but a large pyrex baking dish should work just fine! Set aside. Mix dry ingredients and stir with a wire whisk. Add wet ingredients and stir until just barely combined. Add in Granola and apples, stirring just until coated. You want your batter to be lumpy with out any dry spots.
Pour into prepared pans. Preheat oven to 400 degrees Fahrenheit. Allow batter to rest in pans while oven is coming to temperature and mix Streusel topping ingredients in a small bowl. Drizzle over pancake mixture with a fork, or spoon into a zip top bag and use like a pastry bag, making thin, even lines. Bake for 12-15 minutes, when touched, it should spring back gently. Remove from oven and remove from pan (thanks parchment paper!) and place on wire rack to cool slightly. If you wish, brush tops with 2 more tablespoons of melted butter for a great shine.
These are great eaten the morning of, or as you have need throughout the week. You can also wrap individual portions and freeze them. Just take them out the night before, (or if you forget, pop them in the microwave to defrost) and let them sit on the counter so your breakfast is ready as you bolt out the door!
They're great for a brunch where people might find themselves eating away from the table, serve them with a little lemon curd, apple butter, or small amount of maple syrup! Enjoy!


Thanks to The Kitchin

Frozen Fruit & Yogurt Roll ups......


So I have bags and bags of frozen fruit in my freezer.  Some are store bought, a lot are from myself buying up berries when they are at a great price and freezing them.  I also have a ritual of making a big fruit salad to serve with something freshly baked on Sunday mornings.  I take the left over fruit salad and put in a gallon sized ziplock and freeze it.   This makes it easy for me later to take the bag out and dump it into my blender for my smoothies!  I also love to do this because it avoids waste.  (Little known fact about me... nothing bothers me worst than fruits and veggies being wasted or being thrown away.)  Now all of this is just fine and dandy... I love having a surplus of frozen fruit.  But I found myself getting tired of only using it for the same old things.  Either it goes in a smoothie, baked in a muffin of some type or added to the batter of our pancakes/waffles.  When I came across this recipe I almost did a back flip.  No, I'm just kidding... I can't do a back flip, but honestly I was over joyed.  So alas I share with you this awesome recipe:

Frozen Fruit & Yogurt Rollups
(from Once a Month Mom)

Ingredients:
10 flour tortillas
1-1/2 cups Vanilla yogurt
frozen berries
1/2 cup sugar
1 T. cinnamon
spray butter

Directions:
Mix cinnamon & sugar on a large plate. Spray one side of a flour tortilla with butter, covering the entire surface, then place butter side down on plate with cinnamon and sugar. Press down and move around, coating one side of tortilla in cinnamon and sugar.
Next, place tortilla, sugar side down on another plate. Spread about 1/8 cup of yogurt (I just eyeball this, I don’t measure) in a strip a little left of the center. Add some frozen berries (I bought a bag of mixed, strawberries, black berries, raspberries and blue berries- I cut the strawberries up). Roll the tortilla tight and place on a large cookie sheet.
Continue the process with the rest of the tortillas.
Place the cookie sheet in the freezer for about 2 hours. Remove from freezer, cut each tortilla in half and place them in a large zip lock bag and put them back in the freezer for storage.
To Serve:
Take out of bag and eat immediately. You can let them thaw a little bit, but if you let them thaw too long, they’re mushy, but can be eaten that way too.
Variations: you can try this with different flavors of yogurt and different fruits. Strawberries and bananas would be good…..just be sure to cut the strawberries up, a whole strawberry is hard to eat when frozen.

Tuesday, January 24, 2012

Do It Yourself..... Valentines Day Crafts - Upcycling a Dixie Cup....


Here is a super cute and frugal idea for your little one to hand out to classmates.

Simply print out the adorable vintage inspired paper cup wraps here.


Print and cut out enough wraps to cover your paper cups.  Tape the covers around each cup.  Attach a red pipe cleaner to the top of each cup by poking a hole in each side of the cup and feeding the pipe cleaner through it.  Lastly fill each cup with conversation hearts.  Let your kiddo pass these out to there classmates!  There are so much cuter than the traditional store bought Valentines.


Thanks to: Free Pretty Things For You

How to Make Buttermilk Quick Bread with 10 Variations.....


I was so excited when I came across this recipe.  I love basic recipes that you can manipulate and change! 


Basic Buttermilk Quick Bread Makes one loaf
2 cups (10 oz) all-purpose flour
1/2 cup (4 oz) white sugar
1 1/2 teaspoons baking powder
1/2 teaspoon baking soda
1 teaspoon salt
1 cup (8 oz) buttermilk
1 large egg
1/4 cup (2 oz) unsalted butter, olive oil, or vegetable oil
Heat the oven to 350°F. Grease or spray with nonstick cooking spray a standard 9x5 loaf pan.
Whisk together the flour, sugar, baking powder, baking soda, and salt in a medium mixing bowl. Melt the butter, if using. Whisk it in a separate bowl with the buttermilk and the egg.
Pour the liquid ingredients over the dry ingredients. Gently stir and fold the ingredients until all the flour has been incorporated and a shaggy, wet batter is formed. Be careful not to over-mix.
Scrape the batter into the prepared pan and pat it into the corners. Bake for 45-50 minutes. When finished, the loaf should be domed and golden, and a toothpick inserted into the center should come out clean. Let the loaf cool in the pan for 15 minutes before removing and slicing.
Wrap baked loaves tightly in plastic wrap and store at room temperature. Baked loaves can also be wrapped in plastic and aluminum foil and frozen for up to three months.
Basic Variations:
• Sugar can be reduced to a tablespoon for more savory breads.
• Up to half the flour can be substituted with an alternative flour.
• Replace the buttermilk with a mix of yogurt and milk or milk and a squeeze of lemon.
• Use up to 1 1/2 cups fruits, nuts, olives, cheese, or other ingredients, added to the dry ingredients.
• Use 1-3 teaspoons of herbs or spices, added to the dry ingredients.


10 Variations:
1. Cranberry-Walnut Loaf (pictured above) - 1 c. dried cranberries, 1/2 cup toasted and chopped walnuts, 1 tsp vanilla, zest from one orange
2. Apple-Cinnamon Loaf - 1 c. diced apples, 1 tsp cinnamon, 1/2 cup toasted and chopped nuts
3. Cherry-Almond Loaf - 1 c. dried cherries, 1/2 cup toasted and chopped almonds, 1 tsp almond extract
4. Blueberry Loaf - 1 c. fresh or frozen blueberries, 1 tsp vanilla, zest from one lemon
5. Ginger-Orange Loaf - zest from two oranges, 1/4 cup minced crystallized ginger, 1 tsp cinnamon, pinch of cloves, pinch of nutmeg
6. Herbed Sun-dried Tomato and Cheese Loaf (pictured below) - reduce sugar to 1 T, 1/2 c. grated cheese, 1 tsp oregano, 1/2 tsp thyme, 2 T minced sun-dried tomatoes
7. Onion-Dill Loaf - reduce sugar to 2 T, one minced onion cooked until soft, 1 T minced fresh dill
8. Pesto Loaf - reduce sugar to 1 tablespoon, 1/4 c. pesto, 1/2 c. shredded parmesan cheese
9. Spicy Jalapeno Loaf - reduce sugar to 2 tablespoons, 1/4 cup minced jalapeno peppers, 1 c. shredded cheddar cheese, 2 tsp chili powder
10. Irish Soda Bread Look-Alike Loaf - reduce sugar to 1/4 cup, 1 T caraway seeds, 3/4 cup raisins


Source:
The Kitchin

Saturday, January 21, 2012

Do It Yourself..... Valentines Day Crafts- Teacher gift


Here is another easy, cute idas for a Valentines Day Teacher gift brought to you by Love The Byrd:


Materials
  • Card stock
  • Marker
  • Tube of lotion
  • Double-sided tape
Instructions
  1. Trace your child's hand on card stock. Cut out the traced hand and use it as a template to make a second hand.
  2. Write a message with marker. Affix the hands to a tube of lotion and add card stock hearts with double-sided tape.

    Suggested Messages:
    "You deserve a hand!"
    "Hands down, you're the best."
    "I've got to hand it to you!"

Sarah's French Onion Soup.......


Hello my lovilies... I hope your having a fantastic weekend.  The bird family had a busy day.  We were out of the house for most of the morning.  When we got home... the mama decided that I would make a batch of my french onion soup.  I love cooking this soup when the family is home.  The house smells so heavenly.... and it just creates a certain comforting feeling.  I thought I would share the recipe with you.  The key to this... is letting it cook for a long time.  The ingredients are simple and few, in fact you probably have everything in your pantry/fridge right now. 

Ingredients
About 2 1/2 pounds yellow, white, or red onions
1/4 cup (1/2 stick) unsalted butter
Salt
4 cups beef stock
Freshly ground black pepper
Slices of french Bread
Gruyere, Provolone or Parmesan cheese( I favor sliced provolone) 


Instructions

 Gather your ingredients. You should have about 4 hours until dinner; this soup takes a while to cook.

 Cut each onion in half lengthwise, then slice into half-moons. Slice these half-moons in half again.

 Scrape all the cut onions into a bowl. You will have at least 6 cups of chopped onions — probably more.

 Cut a stick of butter in half, and then into a couple of big pieces.

 Place your skillet,saucepan or my favorite a dutch oven over medium heat and add the butter. Let the butter melt.

 After the butter melts and foams up, add the onions. Stir them to coat well with butter, and sprinkled them thoroughly with about a teaspoon of salt.

Turn the heat to medium low, and let the onions cook. Let them cook, stirring occasionally, for at least  1 1/2 hours.  I usually let them cook for 2 to give them a nice dark color.  Just don't let them burn!


 As the onions reach a dark brown color, pull out your stock.

 Pour in the broth and turn the heat up a little so the soup comes to a boil. Turn the heat down again and let it simmer for another 1 to 2 hours.  Again the longer it cooks... the better it tastes!

 Simmer until the soup has reduced a bit and is shiny and glazed over the onions. Season to taste with salt and pepper,

Ladle soup into oven safe bowls.  Slice french bread slices into cubes and top each soup with bread.  Place a slice of cheese on top of the bread and place under the broiler.  Remove when cheese is melted and starting to brown. Serve immediately!

Thursday, January 19, 2012

Do It Yourself..... Valentines Day Crafts


The mama bird is guilty of something.  I love the Holiday's and take full advantage of crafting, baking and making gifts and decor.  So with Valentines Day coming up... I am already making plans.  I will be sharing here on the byrd a daily DIY (do it yourself) Valentines Day idea.  Today I thought I would start with this adorable Sweet Pea gift.  This would be awesome for a teacher gift or a dear friend.  Get the kiddos in on this one because what could be cuter than a flower pot painted by a five year old?


Materials
  • Kitchen sponge
  • Scissors
  • Three-inch clay pot
  • Acrylic paint
  • Potting soil
  • Plastic baggie
  • Packet of sweet pea seeds
  • Ribbon
Instructions
  1. Cut heart shapes from a kitchen sponge with the scissors.
  2. Using acrylic paints, sponge-print a design onto the pot. Allow to dry.
  3. Place potting soil, seeds and planting instructions into the pot and wrap the whole thing in a ribbon

Pumpkin Breakfast Bars......


Sorry for the absence.  A lot has been going on at the birdie house.  The kiddos are finally back in school and they are already tired of oatmeal and cereal in the mornings.  It's so hard to find the time to get a really good breakfast into them during the school week.  So the mamas here baked up a batch of these Pumpkin Breakfast Bars for the kiddos (and myself).  They are super simple, yummy and you guessed it low in sugar and calories.  This is also a great way to get rid of any leftover cans of pumpkin you may have from Thanksgiving!  Another plus is after they are done baking you can cut them into squares and wrap them individually so they can be grabbed real quick when heading out the door.

  
Ingredients:

2 cups rolled quick oats
1/4 cup all purpose flour
1 teaspoon baking powder
1/2 teaspoon baking soda
2 teaspoons ground cinnamon
1 large egg
3/4 cup pumpkin puree
1/4 cup low fat milk ( you can sub out the milk for almond milk and lower the calories)
1/4 cup sugar free maple syrup
1/3 cup splenda granulated sweetner
1/4 cup packed light brown sugar
2 teaspoons vanilla extract
1/4 cup raisins, chopped

Directions
Preheat the oven to 350 degrees.  Lightly coat a 9 inch square baking pan with nonstick baking spray.

In a large bowl, combine the first 5 ingredients (oats through cinnamon).  Stir.  Add the remaining ingredients and stir until thoroughly combined. 

Pour into prepared baking pan and smooth the top.

Bake for 25 to 30 minutes or until the center springs up when touched or toothpick comes out clean when inserted in the middle.  Let cool on a wire rack for 5 minutes and then turn out of pan to cut (bottoms will become slightly wet if left in pan)

Cut into 12 portions and wrap individually.

Calories:

80 calories per bar - if made with low fat milk
50 calories per bar - if made with almond milk

Thursday, January 5, 2012

Oven Fried Chicken....


This would have to be my crowning achievement!  Yes I made fried chicken tonight..... and no I haven't fell off the band wagon.  It was a healthy spin on the age old comfort food.  I am so excited to share this with you!  It was every bit as good as the typical fried chicken you are use to eating... but with less than half the calories.  The trick is removing the skin, using egg whites only instead of the full egg and using only 1/4 of the normal amount of bread crumbs.  Cornflakes substitute the rest.... I know sounds odd right?  But trust me, sheer heaven!   Pair this with a veggie loaded side salad like I did and you got yourself one finger licking good meal!


Ingredients:

 2 large egg whites
1/2 teaspoon garlic powder
1/2 teaspoon onion powder
1/4 teaspoon cayenne pepper
1/2 teaspoon ground sage
1/4 teaspoon dried thyme
1 1/4 cups cornflake cereal
1/4 cup plain breadcrumbs
1/2 teaspoon black pepper
1/2 teaspoon salt
2 tablespoons all purpose flour
1 1/2 pounds skinned chicken pieces (such as 2 legs, 2 thighs and 1 large breast cut in half)

Directions:

Preheat the oven to 400 degrees.  Place a wire rack on top of a baking sheet and spray with cooking spray.

In a shallow bowl, whisk together the eggwhites with the garlic powder, onion powder, cayenne pepper, sage and thyme.

Place the cereal in a plastic bag and crush thoroughly with a rolling pin.  Place in a shallow bowl and mix together with the breadcrumbs, pepper and salt.

Place the flour in a third shallow bowl.

To bread the chicken pieces, first dredge the chicken in the flour to coat.  Next, dip each piece of chicken into the eggwhite mixture, followed by the crumb mixture, making sure to cover all surfaces.  Repeat until all the chicken is coated.

Place the chicken pieces on the prepared rack and bake for 45 minutes, or until the chicken is golden brown and cooked through.


Calories:

255 calories per piece
Dare to Compare : ( One crispy chicken breast at KFC has 460 calories!)

Wednesday, January 4, 2012

Tex Mex Chili Bake....


So I made this for dinner tonight.  It was my first time making it, and I have to say it was not only really really filling and hearty, but it was really yummy.  This is a great recipe to make when you have a half pound of lean ground beef you need to use up.

Ingredients:

2 teaspoons extra vigin olive oil
3/4 cup chopped onion
1 clove of garlic, minced
1/2 pound of lean ground beef
1 1/2 teaspoons cumin
1/2 teaspoon chili powder
1 (4 ounce) can diced green chilies
1 (15 ounce) can pinto beans, rinsed and drained
1 (14 ounce) can tomatoes, drained
1 tablespoon tomato paste
corn tortillas
2/3 cup reduced fat shredded mexican cheese blend
2 tablespoons chopped cilantro (optional for garnish)

Directions:

Preheat oven to 350 degrees

Heat the oil in a large skillet over medium high heat.  Add the omion and cook for 3 minutes, or until translucent.  Add the garlic, stir and cook for 30 seconds.  Add the beef, cumin and chili powder and cook for 5 minutes or until the beef is no longer pink.

Stir in the chilies, beans, tomatoes, and tomato paste.  Break up the tomatoes, stir and simmer for 5 minutes. 

Spray a 9 inch pie plate with cooking spray.  Make a layer of tortillas on the bottom of pie plate.  Spoon half of the beef mixture on top.  Place a second layer of tortillas on top followed by the rest of the beef mixture.  Place the remaining tortilla on top and sprinkle with cheese.  Sprinkle the cilantro around the edges if using.

Place in the oven and bake for 15 minutes or until hot and cheese is melted.  Cut into four wedges.

Garnish with reduced fat sour cream if desired.


Calories:
310 calories per serving (serving is 1/4 of chili bake)

Banana Split for Breakfast...... Yes Please!


Yummy huh?  Well I am eating this as part of my lunch right now.  Guess what?  It's super good for you!  No kidding.  Instead of ice cream, it's greek yogurt, instead of choclate sauce it's fruit jam or preserve and topped with either granola or nuts. 


Ingredients:


1 ripe yet firm banana, peeled
1/2 cup Greek yogurt
2 tablespoons fruit jam or preserves
2 tablespoons sliced almonds or other nuts
Handful fresh berries or cherries

Directions:

Split the banana lengthwise and lay the two halves in a shallow bowl. Use an ice cream scoop to scoop out the yogurt and put it on top of the banana. Warm the jam in the microwave for 15 to 30 seconds or until it is very runny. Use a spoon to drizzle the jam over the yogurt, and sprinkle the nuts over everything. Top with the berries or cherries, and dig in!

Tuesday, January 3, 2012

Wholesome Blueberry Pancakes.....


The hardest thing about eating right for me is breakfast.  Breakfast is my favorite, favorite, favorite meal!  I love it so much that one night a week at my house.... I make breakfast for dinner for the little birdies.  The problem with breakfast?  It is usually high in sugar, fat, carbs and calories.  For a while I was cooking for the family..... a scrumptious big breakfast, and making myself a smoothie.  Now I am not knocking smoothies.  When the kiddos are in school it is my go to breakfast of choice because I can take it with me on the go.  But, it is so hard not to sit down and indulge in a big stack of pancakes... especially when everyone else around you is.  So alas I present you with this yummy healthy version of Blueberry Pancakes (and yes this will be what I make for breakfast tomorrow morning).


Ingredients:

1/2 cup all purpose flour
1/2 cup whole wheat flour
2 teaspoons baking powder
1/2 teaspoon baking soda
1/2 teaspoon ground cinnamon
1/4 cup splenda granulated sweetner
1/2 cup low fat milk
1 cup low fat cottage cheese
2 large eggs, well beaten
1 teaspoon vanilla extract
3/4 cup fresh blueberries

Directions:

In a medium bowl, mix together the flours, baking powder, baking soda, cinnamon and sweetner.

In another bowl, whisk together the milk, cottage cheese, eggs and vanilla extract.

Whisk the wet ingredients into the dry, being carful not to overmix.  Fold in the blueberries.

Preheat a nonstick griddle or skillet over medium heat.  Allow the pancake batter to rest while the griddle is preheating.  Spray the griddle lightly with cooking spray.

Pour 1/4 cup of batter per pancake and spread into 4 inch circle.  Cook the pancake for 3 to 4 minutes on the first side, until edges appear dry, some of the bubbles have popped, and the underside is browned.  Flip the pancake and cook for another 2 to 3 minutes.  The centers will puff and remain moist.  Serve hot.

Use sugar free or light syrup to keep it healthy.  I have found an awesome 0 calorie sugar free syrup I love by Walden Farms:


This can be found at most heath food stores including Sprouts, Whole Foods and Vitacost online. 

Calories: 
180 Calories in 2 pancakes

Delicious Turkey Burgers.......


For dinner tonight I made Turkey burgers.  These are super simple and quick to make.  Not only are they easy, quick and yummy but they are so much healthier and lower in calories than a traditional burger.  I served these with fresh cut up veggies and some skinny dip.

Ingredients:
 
For Patties-
1 pound of lean ground turkey
1/2 cup of seasoned bread crumbs
1/2 cup of finely diced onion
1 egg white lightly beaten
1/4 cup fresh chopped parsley
2 cloves of garlic minced
1 teasoon salt
 1/2 teaspoon black pepper

For the Trimmings-
whole wheat hamburger buns
white american cheese slices
green leaf lettace (or any type you prefer)
light mayo
assorted veggies (we use red onion and tomato)
avocado (optional)


Directions:

In a large bowl mix ground turkey, seasoned bread crumbs, onion, egg whites, parsley, garlic salt, and pepper.  Form into 6 patties

Cook the patties in a medium skillet over medium heat, turning once, to an internal tempeture of 180 degrees or until cooked through.
Remove from skillet and top with one cheese slice.  Set aside

Place buns ( insides down) in skillet to toast.  Remove.  Add mayo to buns, top with Turkey pattie.  Add lettace, veggies and a slice or two of avocado.  Serve

Calories:
325 Calories in one Turkey Burger with light mayo, whole wheat bun, white American cheese slice, lettuce, tomato, onion and small slice of avocado.

Monday, January 2, 2012

Indulging in Delivery Pizza...... the right way


You know those kinda days... when you are go, go, go all day.  Then you look at the clock and it is 5:00 p.m and you relize you didn't defrost anything for dinner?  Or more importantly.... you are too tired to even think about cooking?  Yeah that was today...... after house cleaning, errand running and finally grocery shopping I looked at the clock and relized that it was an hour til dinner.  As I looked at my little birdies in the rear view mirror, I decided I would rather spend an hour at the park running and playing with them.... then frantically scrambling to make up something for dinner. 
     So to the park we went.... I had fun, the kiddos had fun, and then the mama swung by the local pizza joint and grabbed a large pizza to go.
     Now I am all about eating healthy.  Even on a night like tonight.... with cheesey ooey gooey goodness in hand, you can still stick to healthy eating and habits.  The average large cheese pizza slice is about 250 calories.  Now, that is a lot of calories for only one piece right?  And seriously who is gonna get full off of one slice?  Here is where the problem comes in.  You think your gonna be good and eat just one, but as everyone else dives into slice 2 and 3 and you sit feeling unsatisfied..... you find yourself caving in.  Now your 250 calorie dinner went to 500, 750 or even 1000.
    Here comes in Sarah's solution.  I like to whip up a quick batch of my mock ranch dip and slice up a big heap of veggies.  I take a slice of pizza...... cut it in half and leave one half in the box.  I sit down with the other half of the slice and consume.  I then load up on veggies and dip.  This light dip which I call "skinny dip" only has 65 calories in two tablespoons with a full cup of sliced veggies.  Now you are getting some veggies in with your pizza which is always a plus, and your not starving.  Sometimes I am satisfied enough at this... other times I go back and pick up the other half my slice.  The key is to keep temptation out of reach (hence leaving the other half in the box) and to make better choices handy. 
    
     Here is the recipe for the "skinny Dip" :


Ingredients

1/2 cup buttermilk (you can save a few more calories if you use reduced fat buttermilk)
1/3 cup light mayonnaise
1/4 cup plain nonfat yogurt
1 1/2 teaspoons of Mrs. Dash seasoning
1/2 teaspoon galic powder
1/2 teaspoon onion powder
1/4 teaspoon pepper
1/8 teaspoon salt
Sliced Veggies ( I prefer cucumber, carrots and cheery tomatoes)


Directions:

In a small bowl, whisk the buttermilk, mayo, yogurt, Mrs. Dash, garlic powder, onion powder, pepper and salt together.  Cover and place in refridgerator and chill for 30 min.

Serve dip with sliced veggies


Calories :
1/2 slice of cheese pizza and two servings of dip and veggies - 255 calories
1 slice of cheese pizza with one serving of dip and veggies -  315 calories
1 slice of cheese pizza with two servings of dip and veggies -  380 calories

Sunday, January 1, 2012

Just a lovely little Sunday.....


Started working on one of my new year goals today.  I wanted to make Sunday's our official Family Day.  Each Sunday I want to take the time to enjoy each others company... no house cleaning, laundry or errand running.  Today was quite lovely.  The morning began with all of the birdie family (even daddy bird) sitting down to a breakfast of fresh fruit, fresh baked cinnamon rolls and pipping hot cups of coffee.  No t.v, no computers or video games... just squeals of laughter and good conversation.  Next we snuggled together and watched Seabiscuit.  The mama bird set out a buffet style lunch of finger sandwiches, cheese and crackers and veggies with dip.  after that the girlie birds drew pictures and colored while the baby bird took a nap.  The mama bird got the daddy bird to help her in the kitchen..... making homemade spaghetti sauce and meatballs.  After we got the sauce on and the meatballs simmering.... we sat down to movie #2  The Green Hornet.  After the movie it was family board games.... operation followed by guess who?  The mama bird and daddy bird got quite competitive on that one!  Finally it was dinner.... baths, a little playtime with the baby bird before his bed time.  Once the baby bird was in bed... we watched one more movie together before the girlie birds turned in for the night (Thor if you must know... lol).  It was so nice just enjoying the time together.  Yes the laundry is waiting for me.... and the dishwasher needs to be unloaded... but they will be there tomorrow.  The pile up is so worth it for the kind of day we had today.

Easy Oven Baked French Toast Casserole - The Healthy Way.......


My family loves french bread.  I usually buy two at a time just to let the other loaf sit out for a day to use for this recipe (and for my french onion soup).  I love this recipe.... it's perfect for Sunday mornings, or family holiday gatherings. What makes it even better than your traditional french toast casserole is this one is low on calories and sugar making it a healthier breakfast choice.   I just assembled this tonight so the mama bird and little birds can sit and watch the tournament of roses parade on t.v. tommorrow. 

 Ingredients:

1 cup liquid egg substatute
2 large eggs
2 1/2 cups of low fat milk
2/3 cup of splenda granulated sweetner
1 teaspoon vanilla extract
1/2 teaspoon of maple extract
1 1/2 teaspoons cinnamon
12 ounces of french bread, cut into 2 inch squares
2 teaspoons of powdered sugar

Directions:


Spray a 13 x 9 inch baking dish with non stick cooking spray.

In a large bowl, whisk together the egg substitute, eggs, milk, sweetner, extracts and cinnamon until well mixed.  Add the bread pieces into the mixture and quickly coat by gently stirring. 

Pour into baking dish.  Cover and refridgerate overnight.

Preheat oven to 350 degrees.  Bake for 40 to 45 minutes until puffed in center and lightly browned. 

Remove from the oven and lightly dust with powdered sugar before serving.


150 Calories :  Serving size is 1/10th of the casserole

Spaghetti and Meatballs.......


So today is the first official day of 2012.  Although this is not a brand new goal of mine... (I am kinda piggy backing on my last year goal) I wanted to start the dinner of the new year healthy.  I have always loved cooking, but recently found myself yearning for the ability to reinvent myself and how my family eats.  I wanted to be able to cook much of the same meals that my family and I have grown to love, but healthier.... which means little or no sugar and low in calories/fat.  So I would like to share with you this yummy and easy recipe for homemade spaghetti and meatballs:

For Meatballs:

1/2 pound lean ground beef
1/2 pound of lean ground turkey
1/2 cup dry breadcrumbs
1/4 cup grated Parmesan cheese
3 tablespoons dried minced onion
1 tablespoon dried parsley
1 large egg
2 tablespoons low fat milk
1 teaspoon minced jarred garlic
1 teaspoon dried oregano
1/2 teaspoon salt
1/4 teaspoon fresh ground pepper


Directions:

In a large bowl, with a spoon or with your hands gently mix together all of the ingredients until combined.

With wet hands form into 1 1/4 inch balls.  Set aside


For Sauce/spaghetti

12 ounces spaghetti
1 tablespoon olive oil
1/2 cup finely chopped onion
3 garlic cloves minced
1/2 cup dry red wine or beef broth
1 (28 oz) can crushed tomatoes
1 (6 ounce) can tomato paste
1/2 teaspoon sugar
1 1/2 teaspoons dried basil leaves
1 1/2 teaspoons oregano leaves
pinch of red pepper flakes
1/4 teaspoon black pepper
2 cups of water
garlic salt


Directions:

In a large saucepan, heat the oil over medium high heat.  Add the onion and saute for 3 to 4 minutes or until soft.  Add the garlic and saute for 1 additional minute.  Deglaze the pan by pouring in the wine ( or broth) and scraping the browned bits from the bottom.  Add the tomatoes, tomato paste, sugar, herbs, red pepper, black pepper and water.  Simmer for 15 to 20 minutes.

Cook the pasta according to the package directions while the sauce simmers, drain and set aside.

Gently stir the uncooked meatballs into the sauce and cover.  Simmer for 15 to 20 minutes or until meatballs feel firm and are cooked through. Sprinkle lightly with garlic salt to taste.  Let simmer additional three minutes.

Place pasta in large bowl or platter.  Pour sauce onto pasta and top with meatballs.

420 Calories:   in one cup of pasta,  1/2 cup of sauce and 3 meatballs